Securiti Launches Industry’s First Solution To Automate Compliance

View
Cookie Consent Integrations | Plugins & Setup Guides

Integrating Securiti with Google Tag Manager

You can use the Google Tag Management system to honor cookie preferences submitted through the Securiti cookie consent management features. If your website uses Google Tag Manager to deploy third party libraries, it can prevent them from triggering until website visitors have given their consent to the use of cookies. You can connect your Google Tag Management System to our Cookie Consent Manager to control the blocking or firing of tags. Follow the procedures in the sections below.

Scan Your Website and Classify Cookies

First, scan your website for cookies. Then review the automatic cookie categorization from the scan results.

Build a Website Banner

Build a website banner and embed its code on your website.

Create a Cookie Accepted Variable

1

Start Google Tag Manager.

2

Near the left edge of the page, click Variables.

3

In the User-Defined Variables area, click New.

4

Near the upper left corner of the Variable Configuration box, edit the variable name so it reads cookieAccepted.

Google Tag Manager CookieAccepted
5

Near the upper right corner of the Variable Configuration box, click Edit (pencil icon).

6

Click Data Layer Variable.

7

In the Data Layer Variable Name box, type the name cookieAccepted.

8

Near the upper right corner of the page, click Save.

9

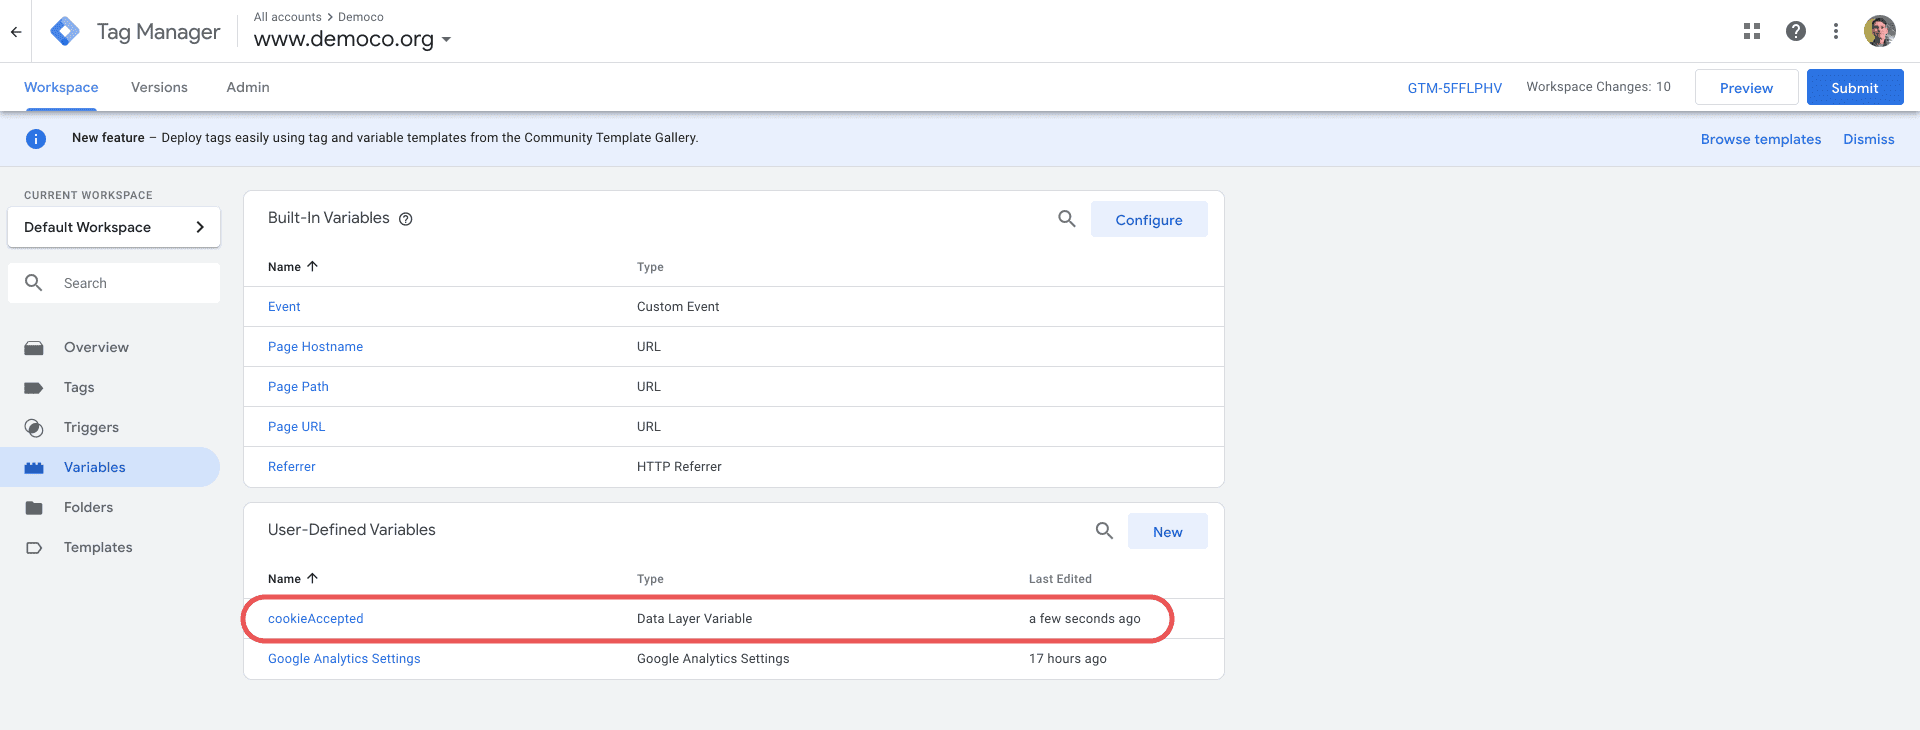
On the Variables page, confirm that there is a new data layer variable called "cookieAccepted."

Google Tag Manager Variables Settings

Create a Watcher Tag and Trigger

1

Near the left edge of the page, click Tags.

2

Near the upper right corner of the Tags box, click New.

3

Near the upper left corner of the Tag Configuration area edit the variable name so it reads Watcher.

4

Near the upper right corner of the Tag Configuration area, click Edit (pencil icon).

GTM Tag Configuration
5

On the Choose tag type panel, scroill down to the Custom area and choose Custom HTML.

6

In the HTML area, paste the following code snippet:

<script>
window.addEventListener('message', function (ev) {
if (ev.data.message==='consent_given') {
console.log(ev.data.consentStatuses);
ev.data.consentStatuses&&Object.keys(ev.data.consentStatuses).forEach(function (category) {
if (ev.data.consentStatuses[category]) {
dataLayer.push({
'event': 'userPrefUpdate',
'cookieAccepted': category
})
}
})
}
})
</script>
7

Near the upper right corner of the Triggering area, click Edit (pencil icon).

8

Near the upper right corner of the Choose a Trigger panel, click +.

9

Near the upper left corner of the panel, edit the trigger name so it reads Watcher Trigger.

GTM Watcher Trigger
10

Near the upper right corner of the Trigger Configuration area, click Edit (pencil icon).

11

On the Choose trigger type panel, choose DOM Ready.

Google Tag Manager DOM Ready
12

Near the upper right corner of the trigger panel, click Save.

13

Near the upper right corner of the tag panel, click Save.

Create Cookie Category Triggers

For each of the following cookie categories, you create a trigger:

  • Essential
  • Performance & Functionality
  • Analytics & Customization
  • Advertising
  • Social Networking
1

In Google Tag Manager, near the left edge of the page choose Triggers.

2

Near the upper right corner of the Triggers list, click New.

3

Near the upper left corner of the trigger panel, edit the trigger name so it reads <cookie category name> Trigger, for example "Advertising Trigger."

4

Near the upper right corner of the Trigger Configuration area, click Edit (pencil icon).

GTM Trigger Configuration area
5

On the Choose trigger type panel, scroll down to the Other area and click Custom Event.

6

In the Event Name box, type userPrefUpdate.

7

Mark the checkbox for Use regex matching.

8

Mark the radio button for Some Custom Events.

9
Near the bottom of the panel, configure the event so that it is:
cookieAccepted matches RegEx (ignore case) <cookie_category>
Where <cookie_category> matches one of the available categories verbatim.
GTM Advertising Cookie Trigger
10

Near the upper right corner of the trigger configuration panel, click Save.

11

Repeat the procedure for each of the remaining cookie categories.

GTM Cookie Categories

Add Category Triggers to your Existing Cookie Tags

For each of the existing tags that control your cookies, add the category triggers so that they drop cookies only when the watcher receives the userPrefUpdate object from Securiti:

1

In Google Tag Manager, near the left edge of the page choose Tags.

2

From the tags list, choose a tag that manages a category of cookies, for example Advertising.

3

On the panel for the tag, near the upper right corner of the Triggering area click Edit.

4

On the Choose a Trigger panel, choose the corresponding tag you created in the procedure Create cookie category triggers.

GTM Cookie Category Triggers
5

On the tab panel, click Save.

6

Repeat the procedure for the remaining cookie categories.

Check our Cookie Integrations

What's
New